MySQL Enterprise Monitor (MEM) is the monitoring solution offered as part of MySQL Enterprise Edition and MySQL Cluster Carrier Grade Edition. In this blog, I will not go into details of the features of MEM, but rather focus on the case where you want to install MEM 3.0 to try it out on your personal desktop or laptop.
A trial version (the full product, but the can only be used for 30 days) is available from Oracle’s Software Delivery Cloud. If you are a MySQL customer, it is recommended that you download MEM from My Oracle Support (MOS).
Once you have downloaded and extracted the installation binaries, you can start the installation. You have the choice between using a GUI, text based, and unattended install. Here I will use the GUI install, but if you want to try one of the other install options, launch the installer with the –help option to get more information.
MEM 3.0 consists of two parts:
- The Service Manager
- Agents
Only the Service Manager is required, so that will be the first thing to install. As this is intended to show how you can test MEM, I will use a normal user rather than root for the installation.
It is also recommended to take a look at the MEM 3.0 Reference Manual.
Installation Wizard
When launching the installer the first screen asks which language to use – you have the choice of English and Japanese:
![Installing the MEM 3.0 Service Manager - Step 1: Choose language]()
Step 1: Choose language
Next is an information screen that you should ensure you keep track of the usernames and passwords entered during the installation process:
![Installing the MEM 3.0 Service Manager - Step 2: Remember the usernames and passwords entered during the installation process]()
Step 2: Remember the usernames and passwords entered during the installation process
The actual install process is now ready to start:
![Installing the MEM 3.0 Service Manager - Step 3: Ready to start the actual install process]()
Step 3: Ready to start the actual install process
The following steps are to configure the installation – the first of which is to decide where to install the Service Manager:
![Installing the MEM 3.0 Service Manager - Step 4: Choose the installation directory]()
Step 4: Choose the installation directory
The Service Manager will need three ports:
- Tomcat Server Port: For the web UI when using non-SSL connections
- Tomcat Shutdown Port: Used internally to shutdown the web server
- Tomcat SSL Port: For the web UI when using SSL connections
![Installing the MEM 3.0 Service Manager - Step 5: Choose the port numbers]()
Step 5: Choose the port numbers
The Service Manager uses a MySQL database to store the data collected. The next screen allows you to choose between using the MySQL database bundled with MEM or an existing one. Using the bundled instance has the advantage that MEM will configure it automatically and upgrades can be easier, however it will mean running two MySQL instances if you already have MySQL installed. For a test instance using the bundled instance also has the advantage that it’s easy to uninstall the whole installation again, so we will use the bundled instance in this example:
![Installing the MEM 3.0 Service Manager - Step 6: Choose whether to use the bundled MySQL database or an existing one]()
Step 6: Choose whether to use the bundled MySQL database or an existing one
The final of the pre-installation configuration is to choose the username and password to use for the connection to the MySQL database. This is the username and password that you were reminded of earlier to make sure you remember:
![Installing the MEM 3.0 Service Manager - Step 7: Specify username and password for the Service Manager to connect to the MySQL database storing the data collected through the monitoring]()
Step 7: Specify username and password for the Service Manager to connect to the MySQL database storing the data collected through the monitoring
Next a note that because we have chosen to install the Service Manager as a non-root user, it will not be started automatically when the server is restarted:
![Installing the MEM 3.0 Service Manager - Step 8: Info that MEM will not start automatically when not installed as root]()
Step 8: Info that MEM will not start automatically when not installed as root
Ready to Install:
![Installing the MEM 3.0 Service Manager - Step 9: Configuration completed]()
Step 9: Configuration completed – ready to install
The Service Manager is now being installed – this will take a little while as it both includes copying all the files in place as well as configuring and starting the web server and the bundled MySQL database:
![Installing the MEM 3.0 Service Manager - Step 10: Installation is in progress]()
Step 10: Installation is in progress
MEM includes an uninstall script if you need to remove the Service Manager again:
![Installing the MEM 3.0 Service Manager - Step 11: Files are now installed]()
Step 11: Files are now installed
To improve security MEM 3.0 by default uses SSL. The installation process adds a self-signed certificate, but you can choose to install your own certificate later:
![Installing the MEM 3.0 Service Manager - Step 12: Information that MEM is using SSL with a self-signed certificate by default]()
Step 12: Information that MEM is using SSL with a self-signed certificate by default
The installer is now done and it is time to launch the UI:
![Installing the MEM 3.0 Service Manager - Step 13: Ready to launch the Service Manager]()
Step 13: Ready to launch the Service Manager
Unattended Install
If you go through the installation process often, it is more convenient to use the unattended installation as it allows you to automate the installation. To perform the same installation as above using the unattended installation you can execute:
shell$ ./mysqlmonitor-3.0.3.2912-linux-x86_64-installer.bin \
> --mode unattended --unattendedmodeui none \
> --installdir /home/jkrogh/mysql/enterprise/monitor \
> --adminuser service_manager --adminpassword mypassword \
> --dbport 13306 --mysql_installation_type bundled \
> --tomcatport 18080 --tomcatshutdownport 18005 --tomcatsslport 18443
As several of the values are the default ones, you can skip some of the options, but they are included here for completeness.
When the above command completes, continue with the post-installation configuration as you would have done using the installation wizard.
Post-Installation Configuration
Once the Service Manager UI has opened in your browser there is a little post-installation configuration to take care of:
- You need to create an admin user for the web UI
- You need to create a user agents can use if you choose to install any agents
- You can choose whether to have the Service Manager automatically check for updates and how for how long time to keep historical data
![Installing the MEM 3.0 Service Manager - Step 14: Post installation configuration]()
Step 14: Post installation configuration
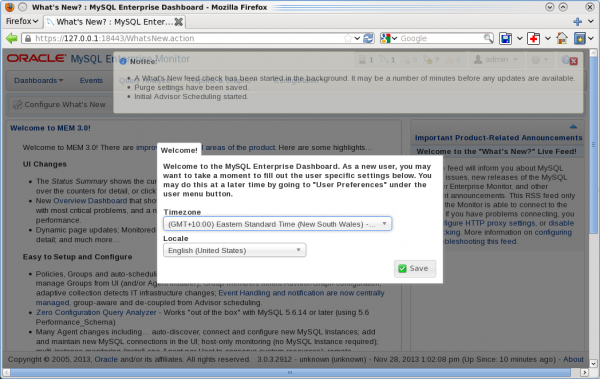
The last step if to choose your timezone and which locale to use in the user interface:
![Installing the MEM 3.0 Service Manager - Step 15: Choose timezone and the locale]()
Step 15: Choose timezone and the locale
After this you are ready to play around with the monitor. If you choose to install agents, the steps are similar.
Reducing Memory Footprint
One thing to be aware of though is that the default configuration used by the Service Manager is aimed at a small to medium production installation. If you for example installed MEM in a virtual machine or computer with limited memory available, the default configuration may not be optimal.
With the installation above just completed, the memory usage of the web server (Tomcat) and the bundled MySQL database is:
PID USER      PR  NI  VIRT  RES  SHR S %CPU %MEM    TIME+  COMMAND
15653 jkrogh    20   0 3794m 924m  13m S  1.0 23.4   4:46.01 java
15586 jkrogh    20   0 3425m 608m 9588 S  2.6 15.4   2:23.88 mysqld
So around 1.5G resident memory. That is without adding any additional agents and/or MySQL instances to monitor.
So when I use MEM for testing, the first thing I do is to change a few configuration values to reduce the memory usage. The configuration options I change are located in two files (paths are given relative to the installation directory):
- mysql/my.cnf – options related to the bundled MySQL database
- apache-tomcat/bin/setenv.sh – options related to the web server
mysql/my.cnf
For the MySQL database I change two setting:
- innodb_buffer_pool_size – this is by default 768M, but if you only monitor a couple of MySQL instances, something like 100M is enough
- table_definition_cache – this is by default 2048. One side effect of the value being so large is that the auto-sizing of the Performance Schema considers the installation as a large instance, so the Performance Schema tables are made large. Reducing the value to 800 is enough for testing and will reduce the memory usage of the Performance Schema with several hundred megabytes.
So my mysql/my.cnf looks something like this after the changes:
...
[mysqld]
...
# Main Caches
table_definition_cache = 800
...

# InnoDB
...
innodb_buffer_pool_size = 100M
...
apache-tomcat/bin/setenv.sh
It is only necessary to edit one line in the Tomcat configuration file – the default settings are:
JAVA_OPTS="-Xmx768M -Xms768M -XX:+HeapDumpOnOutOfMemoryError -XX:HeapDumpPath=/home/jkrogh/mysql/enterprise/monitor/apache-tomcat/temp -XX:+UseParallelOldGC -XX:MaxPermSize=512M"
I change that to:
JAVA_OPTS="-Xmx256M -Xms256M -XX:+HeapDumpOnOutOfMemoryError -XX:HeapDumpPath=/home/jkrogh/mysql/enterprise/monitor/apache-tomcat/temp -XX:+UseParallelOldGC -XX:MaxPermSize=200M"
I.e. the three setting I have changed are:
- -Xmx (maximum heap size) from 768M to 256M
- -Xms (minimum heap size) from 768M to 256M
- -XX:MaxPermSize from 512M to 200M
Enabling the New Configurations
It requires restarting the Service Manager to make the new configurations take effect. You can do the restart by going into the installation directory and execute:
monitor$ ./mysqlmonitorctl.sh restart
Using CATALINA_BASE:   /home/jkrogh/mysql/enterprise/monitor/apache-tomcat
Using CATALINA_HOME:   /home/jkrogh/mysql/enterprise/monitor/apache-tomcat
Using CATALINA_TMPDIR: /home/jkrogh/mysql/enterprise/monitor/apache-tomcat/temp
Using JRE_HOME:        /home/jkrogh/mysql/enterprise/monitor/java
Using CLASSPATH:       /home/jkrogh/mysql/enterprise/monitor/apache-tomcat/bin/bootstrap.jar:/home/jkrogh/mysql/enterprise/monitor/apache-tomcat/bin/tomcat-juli.jar
Using CATALINA_PID:    /home/jkrogh/mysql/enterprise/monitor/apache-tomcat/temp/catalina.pid
Stopping tomcat service . [ OK ]
Stopping mysql service . [ OK ]
./mysqlmonitorctl.sh : mysql  started
131128 13:58:59 mysqld_safe Logging to '/home/jkrogh/mysql/enterprise/monitor/mysql/runtime/mysqld.log'.
131128 13:58:59 mysqld_safe Starting mysqld daemon with databases from /home/jkrogh/mysql/enterprise/monitor/mysql/data/
Using CATALINA_BASE:   /home/jkrogh/mysql/enterprise/monitor/apache-tomcat
Using CATALINA_HOME:   /home/jkrogh/mysql/enterprise/monitor/apache-tomcat
Using CATALINA_TMPDIR: /home/jkrogh/mysql/enterprise/monitor/apache-tomcat/temp
Using JRE_HOME:        /home/jkrogh/mysql/enterprise/monitor/java
Using CLASSPATH:       /home/jkrogh/mysql/enterprise/monitor/apache-tomcat/bin/bootstrap.jar:/home/jkrogh/mysql/enterprise/monitor/apache-tomcat/bin/tomcat-juli.jar
Using CATALINA_PID:    /home/jkrogh/mysql/enterprise/monitor/apache-tomcat/temp/catalina.pid
The memory usage is now somewhat smaller:
PID USER      PR  NI  VIRT  RES  SHR S %CPU %MEM    TIME+  COMMAND
19521 jkrogh    20   0 2847m 544m  15m S  2.0 13.8   1:51.61 java
19484 jkrogh    20   0 2407m 160m 9296 S  0.3  4.1   0:09.21 mysqld